How to create a new Angular 7 project
Are you ready to create a brand new Angular project? The CLI can help you with common settings.
Table of Contents
Just a second! 🫷
If you are here, it means that you are a software developer. So, you know that storage, networking, and domain management have a cost .
If you want to support this blog, please ensure that you have disabled the adblocker for this site. I configured Google AdSense to show as few ADS as possible - I don't want to bother you with lots of ads, but I still need to add some to pay for the resources for my site.
Thank you for your understanding.
- Davide
Before reading this article, be sure you know what Node.js, NPM and Angular are. If you are not sure, here’s a short reminder.
In this article, I’m gonna use the Angular CLI (Command line interface) to create a simple Angular project. I have the version 6.2.0 of @angular/cli installed on my system. I know, Angular CLI v7 has recently been released, but these options are still valid.
ng new
The ng new command allows you to create a new Angular project. You have to navigate to the folder that will contain the project and run the command ng new project-name. It will create the folder project-name with the Angular project in it. There are few options that you can specify when creating the project, and you can see the list with the option –help.
Run ng new --help. You’ll see something like this:
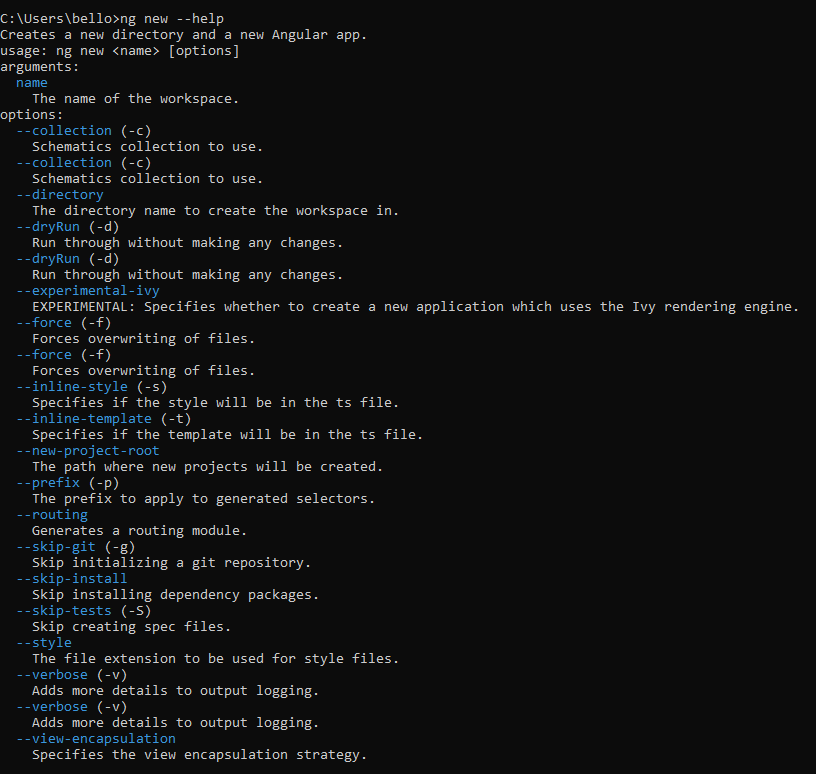
This is the list of available options. In this article I’ll show you the most important ones, for me, to have a go with a project.
–dry-run
One of the least used options (but one of the most useful) is --dry-run, that gives you a preview of the file generated with the command without really creating the files.
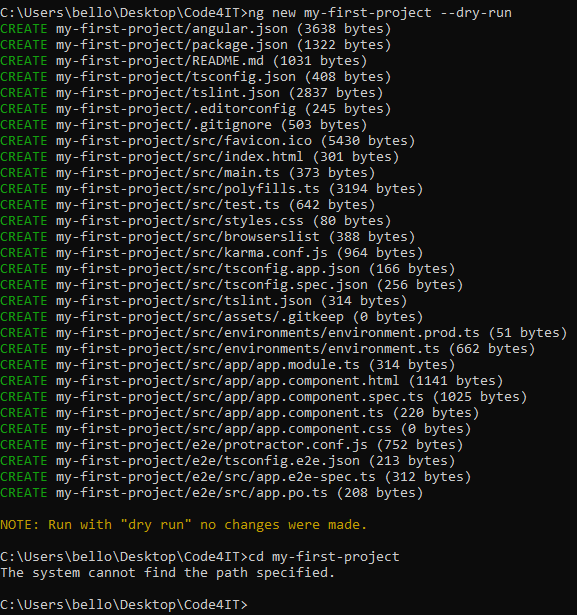
As you can see in the above picture, the –dry-run (or the alias -d) shows you the file that would be created if you run the command without the –dry-run option. The yellow note confirms that the files weren’t actually created, but that was a simulation.
This is also confirmed by the fact that looking up for the my-first-project dir, this doesn’t exist.
–skip-install
If you want to create a project without losing time with the installation of the node modules, --skip-install is your choice.
With this option, the project will contain only the files, but packages won’t be available until you run the npm install command.
–style
With the style option, you can define the style of your style files for your project. The default is CSS, but you can specify your favorite kind with the command
ng new my-project --syle=style-extension
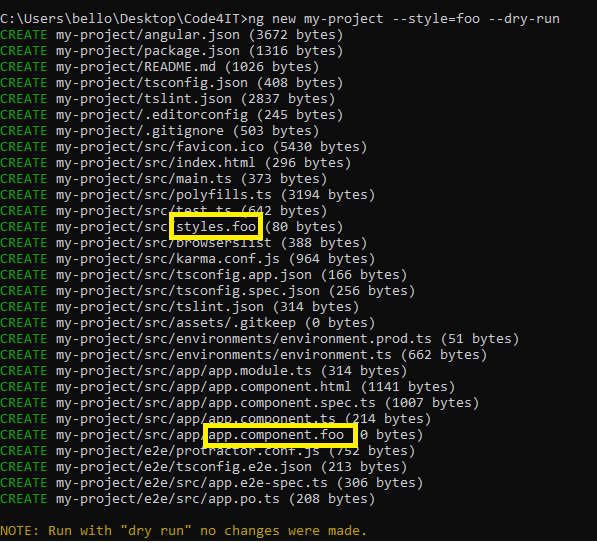
Common sense makes you think that the available values would be CSS, SCSS and LESS, but the fact is that you can specify whatever you want, even not existing style format.
In the example below I set the value to foo.
–routing
Routing is one of the keys to the success of Angular, and of course of Angular-based sites.
With the --routing option you can tell the CLI to create the Routing Module and to add it to the AppModule.
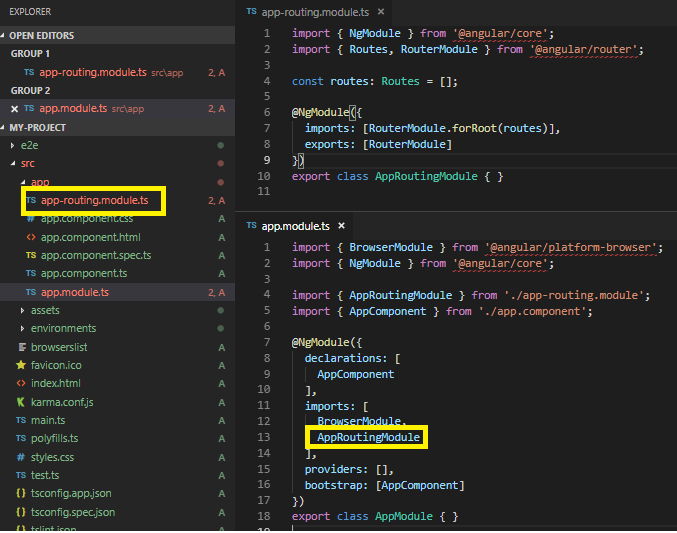
–prefix
The default prefix for the directives is app: you can find it in the AppComponent selector (app-root) and in every component or directive you create with the CLI.
To change the default prefix you can use the –prefix option:
ng new my-project --prefix=foo
This will set the default prefix to foo for the whole application, updating also the corresponding property in the angular.json file.
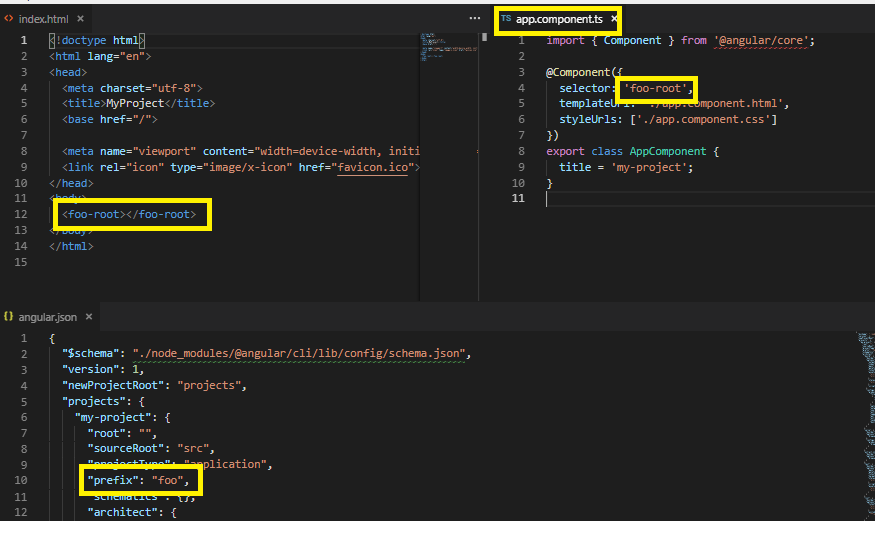
Note: the prefix isn’t about the name of the components and directives, but only the way they are referenced in the templates.
–inline-style
Sometimes you don’t want to create files for styles. The --inline-style will prevent it.
Using this option the styles will be created directly in the component metadata. The styles file won’t be created at all.
Notice that this option refers only to the component styles. The default style of the application (the one whose extension can be defined with the –style option) will be created as usual.
–inline-template
Similar to the inline-style option, inline-template won’t create the HTML file but will allow you to add HTML structure directly in the component.
This article first appeared on Code4IT
Wrapping up
In this article, I gave a glimpse of what the CLI can do for you when creating a new project. There are more options available, but I think that the most useful are the ones listed above.

