How to integrate MongoDB with C#
MongoDB is a database based on JSON-like documents, but it can be queried using C#. We’ll see how to perform CRUD operations and we’ll create some advanced queries.
Table of Contents
Just a second! 🫷
If you are here, it means that you are a software developer. So, you know that storage, networking, and domain management have a cost .
If you want to support this blog, please ensure that you have disabled the adblocker for this site. I configured Google AdSense to show as few ADS as possible - I don't want to bother you with lots of ads, but I still need to add some to pay for the resources for my site.
Thank you for your understanding.
- Davide
MongoDB is one of the most famous document database engine currently available. A document database is a kind of DB that, instead of storing data in tables, stores them into JSON-like documents. You don’t have a strict format as you would have with SQL databases, where everything is defined in terms of tables and columns; on the contrary, you have text documents that can be expanded as you want without changing all the other documents. You can also have nested information within the same document, for example, the address, info of a user.
Being based on JSON files, you can query the documents using JS-like syntax.
But if you are working with .NET, you might want to use the official MongoDB driver for C#.
How to install MongoDB
If you want to try MongoDB on your local machine, you can download the Community Edition from the project website and install it with a few clicks.
If you’re already used Docker (or if you want to move your first steps with this technology), you can head to my article First steps with Docker: download and run MongoDB locally: in that article, I explained what is Docker, how to install it and how to use it to run MongoDB on your machine without installing the drivers.
Alternatively, if you don’t want to install Mongo on your machine, you can use the cloud version, Mongo Atlas, which offers a free tier (of course with limited resources).
Understanding the structure of a MongoDB database
As we’ve already seen, there are not tables. So how can you organize your data?
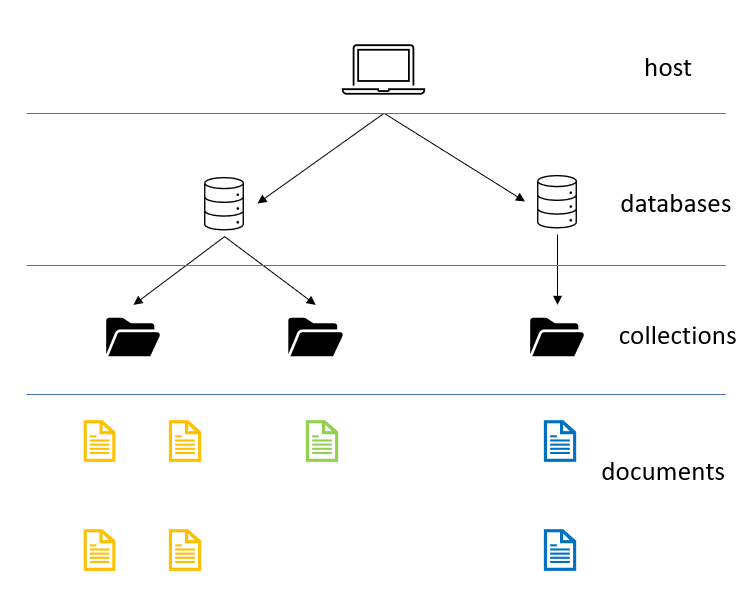
The base structure is the document: here you’ll store the JSON structure of your data, with all the nested fields. Documents can be queried by referencing the field names and by applying filters and sorting. On the contrary of real files, documents have no name.
Documents are grouped in collections: they are nothing but a coherent grouping of similar documents; you can think of them as they were folders.
All the collections are stored within a database on which you can apply security rules, perform statistical analysis, and so on.
Finally, of course, all databases will be stored (and exposed) on a host: it’s the endpoint reachable to perform queries. You can structure your hosts to replicate data to split the load between different nodes.

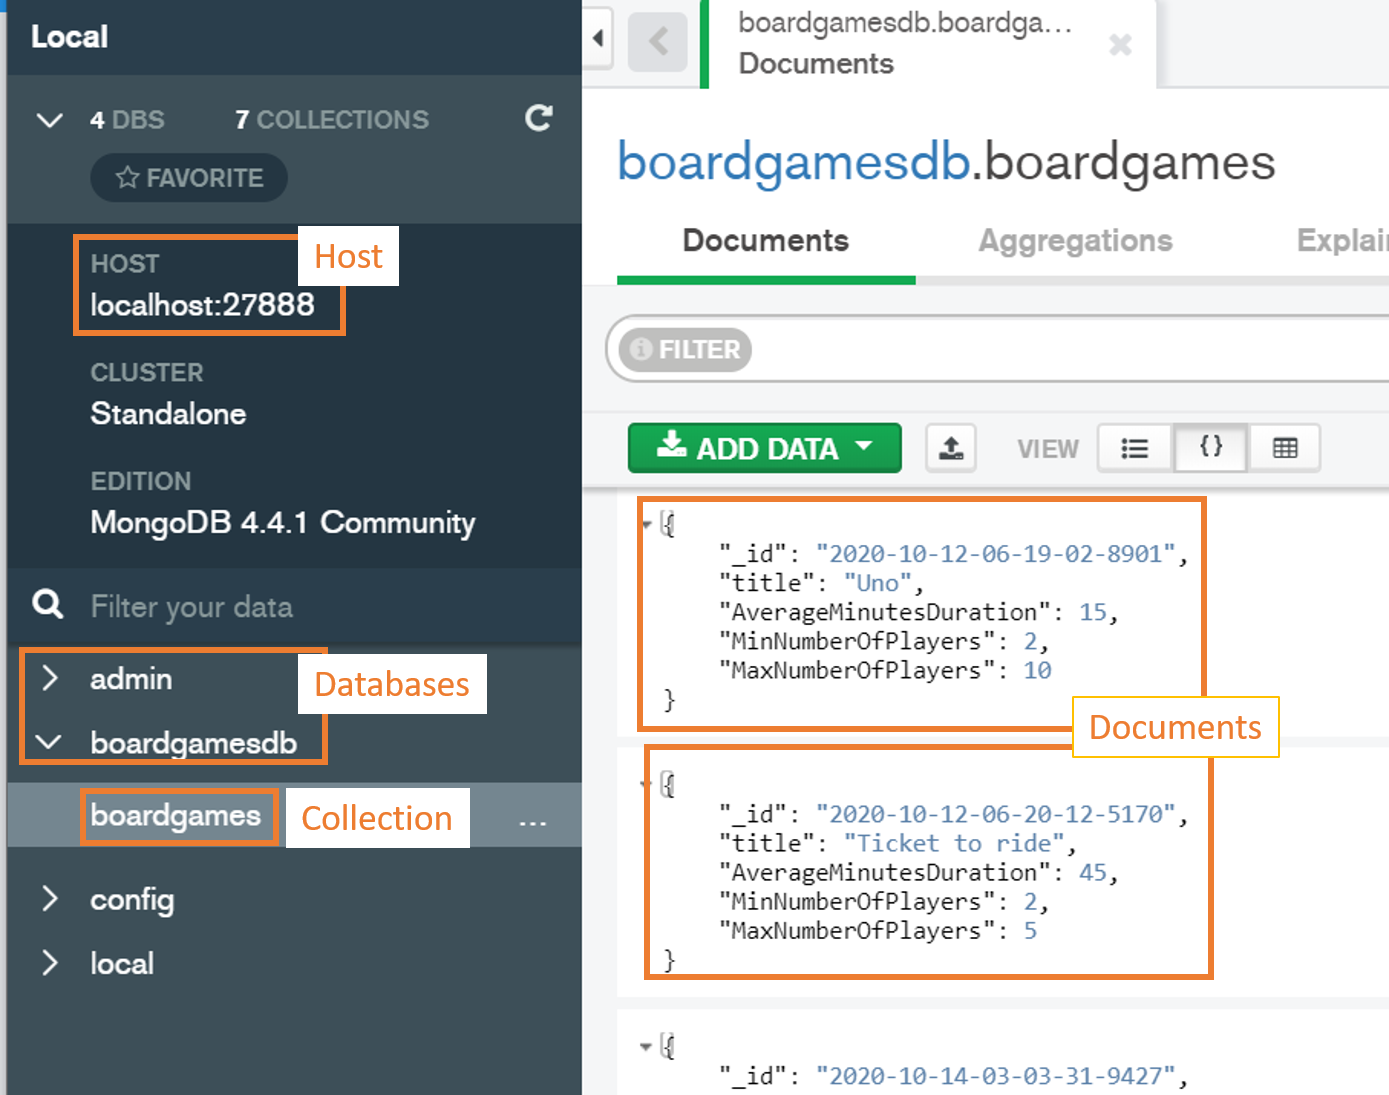
For this article, since I’m going to run MongoDB using Docker, you’ll see that my host is on localhost:27888 (again, to see how I set up the port, have a look at my other article).
Of course, you can use different applications to navigate and interact with MongoDB databases. In this article, I’m going to use MongoDB Compass Community, a tool provided directly by MongoDB.
In the image below you can see the host-database-collection-document structure as displayed by MongoDB Compass.

Of course, you can use other tools like NoSQLBooster for MongoDB and Robo 3T or simply rely on the command prompt.
Time to run some queries!
Setting up the project
I’ve created a simple API project with .NET Core 3.1. To use the C# driver you must install some NuGet packages: MongoDB.Driver, MongoDB.Driver.Core and MongoDB.Bson.
The class we’re going to use is called Game, and has a simple definition:
public class Game
{
   public ObjectId Id { get; set; }

   [BsonElement("title")]
   public String Name { get; set; }

   public int AverageMinutesDuration { get; set; }
   public int MinNumberOfPlayers { get; set; }
   public int MaxNumberOfPlayers { get; set; }
}
It’s a POCO class with a few fields. Let’s focus on 3 interesting aspects of this class:
First of all, the Id field is of type ObjectId. This is the default object used by MongoDB to store IDs within its documents.

Second, the id field name is Id: MongoDriver requires that, if not specified, the document entity Id must match with a property of type ObjectId and whose name is Id. If you choose another name or another type for that field you will get this exception:
FormatException: Element ‘_id’ does not match any field or property of class BoardGameAPI.Models.Game.
If you want to use another name for your C# property, you can decorate that field with the BsonId attribute (we’ll see it later).
The last thing to notice is the Name property: do you see the BsonElement attribute? You can use that attribute to map a C# field to a specific property within the document that has a different name. If you look at the screenshot above, you’ll notice the title field: that field will be mapped to the Name property.
Accessing to the DB and the collection
Since this is an API application, we can handle CRUD operations in a Controller. So, in our BoardGameController, we can initialize the connection to the DB and get the reference to the right collection.
private readonly MongoClient client;
private readonly IMongoDatabase db;
private readonly IMongoCollection<Game> dbCollection;

public BoardGameController()
{
   client = new MongoClient("mongodb://mongoadmin:secret@localhost:27888/boardgamesdb?authSource=admin");
   db = client.GetDatabase("boardgamesdb");
   dbCollection = db.GetCollection<Game>("boardgames");
}
Let’s analyze each step:
Initialize a client
The very first step is to create a connection to the DB. The simplest MongoClient constructor requires a connection string to the MongoDB instance. A connection string is made of several parts: protocol, username, password, db host, port, db name and other attributes.
var client = new MongoClient("mongodb://mongoadmin:secret@localhost:27888/boardgamesdb?authSource=admin")
If you have a look at my other article about Docker and Mongo, you’ll see how I set up username, password and port.

The MongoClient class allows you to perform some operations on the databases stored on that host, like listing their names with ListDatabaseNames and ListDatabaseNamesAsync, or drop one of those DBs with DropDatabase and DropDatabaseAsync.
Behind the scenes, a MongoClient represents a connection pool to the database. As long as you use the same connection string, you can create new MongoClient objects that will still refer to the same connection pool. This means that you can create as many MongoClient instances to the same connection pool without affecting the overall performance.
Connect to the DB
Using the newly created Mongo Client, it’s time to get a reference to the database we’re going to use.
IMongoDatabase db = client.GetDatabase("boardgamesdb");
What if the boardgamesdb does not exist? Well, this method creates it for you and stores the reference in the db variable.
Just like with MongoClient, you can perform operations on the level below; in this case, you operate on collections with methods like ListCollectionNames, GetCollection, CreateCollection, and DropCollection.
Get the reference to the collection
Finally, since we must operate on documents within a collection, we need a reference to that specific collection (or create it if it does not exist)
IMongoCollection<Game> dbCollection = db.GetCollection<Game>("boardgames");
So now we have an object that maps to all the documents in the boardgames collections to our Game class.
Once we have that collection, we can perform all the queries we want.
Insert operation
If we want to retrieve some data, we have to insert some first. It’s incredibly simple:
[HttpPost]
public async Task<ActionResult> Add([FromBody] Game newGame)
{
   dbCollection.InsertOne(newGame);
   return Ok();
}
The Game object comes from the body of my HTTP POST request and gets stored directly in the MongoDB document.

Notice that even though I haven’t defined the ID field in the request, it is autogenerated by MongoDB. So, where does that _id field come from?
How to manage IDs: ObjectId and custom Id
Do you remember how we’ve defined the ID in the Game class?
public ObjectId Id { get; set; }
So, in Mongo, that ObjectId field gets stored in a field called _id with this internal structure:
"_id": {
   "$oid": "5f8490cf9c1f367f604e751b"
}
What if we wanted to use a custom ID instead of an ObjectId?
First of all, we can remove the Id field as defined before and replace it with whatever we want:
- public ObjectId Id { get; set; }
+ public string AnotherId { get; set; }
And now, for the key point: since Mongo requires to store the Id in the _id field, we must specify which field of our class must be used as an Id. To do that, we must decorate our chosen field with a [BsonId] attribute.
+ [BsonId]
  public string AnotherId { get; set; }
So, after all these updates, our Game class will have this form:
public class Game
{
   /** NOTE: if you want to try the native Id handling, uncomment the line below and comment the AnotherId field*/
   // public ObjectId Id { get; set; }

   [BsonId]
   public string AnotherId { get; set; }

   [BsonElement("title")]
   public string Name { get; set; }
   public int AverageMinutesDuration { get; set; }
   public int MinNumberOfPlayers { get; set; }
   public int MaxNumberOfPlayers { get; set; }
}
Of course, we must update also the Insert operation to generate a new Id. In this case, I chose the use the date of the insertion:
[HttpPost]
public async Task<ActionResult> Add([FromBody] Game newGame)
{
   newGame.AnotherId = DateTime.UtcNow.ToString("yyyy-MM-dd-hh-mm-ss");
   dbCollection.InsertOne(newGame);
   return Ok();
}
which will populate our item with this JSON:
{
  "_id": "2020-10-12-06-07-07",
  "title": "Dixit",
  "AverageMinutesDuration": 30,
  "MinNumberOfPlayers": 3,
  "MaxNumberOfPlayers": 6
}
Remember to choose wisely how do you want to store your ID, since if you decide to change your format while your application is already in place, you’ll have trouble to handle both the ID format or to switch from one format to another.
For this article, I’ll stay with our custom Id, since it’s easier to manage. Of course, I have to drop the collection and add new coherent data.
Get
Get all items
To find an item you have to use the Find and FindAsync methods.
[HttpGet]
public async Task<ActionResult<IEnumerable<Game>>> GetAll()
{
   FilterDefinitionBuilder<Game> filter = Builders<Game>.Filter;
   FilterDefinition<Game> emptyFilter = filter.Empty;

   IAsyncCursor<Game> allDocuments = await dbCollection.FindAsync<Game>(emptyFilter).ConfigureAwait(false);

   return Ok(allDocuments.ToList());
}
The key point is the filter parameter: it is a Filter in the format required by Mongo, which is strictly linked to the Game class, as you can see with var filter = Builders<Game>.Filter. So, in general, to filter for a specific class, you have to define a filter of the related type.
To get all the items, you must define an empty filter. Yes, not a null value, but an empty filter.
What does FindAsync return? The returned type is Task<IAsyncCursor<Game>>, and that means that, once you’ve await-ed it, you can list all the Games by transforming it into a list or by fetching each element using the Current and the MoveNext (or the MoveNextAsync) methods.
A quick note: the ToList method is not the one coming from LINQ, but it’s defined as an extension method for IAsyncCursor.
Get by ID
Most of the time you might want to get only the element with a given Id.
The code is incredibly similar to our GetAll method, except for the definition of a different filter. While in the GetAll we used an empty filter, here we need to create a new filter to specify which field must match a specific condition.
[HttpGet]
[Route("{id}")]
public async Task<ActionResult> GetById(string id)
{
   var filter = Builders<Game>.Filter;
   var eqFilter = filter.Eq(x => x.AnotherId, id);

   var game = await dbCollection.FindAsync<Game>(eqFilter).ConfigureAwait(false);

   return Ok(game.FirstOrDefault());
}
Here we are receiving an ID from the route path and we are creating an equality filter on the AnotherId field, using filter.Eq(x => x.AnotherId, id).
This is possible because the id variable type matches with the AnotherId field type, since both are strings.
What if we were still in the old version, with the ObjectId type for our IDs?
[HttpGet]
[Route("{id}")]
public async Task<ActionResult> GetById(string id)
{
   var filter = Builders<Game>.Filter;
-  var eqFilter = filter.Eq(x => x.AnotherId, id);
+  var eqFilter = filter.Eq(x => x.Id, new ObjectId(id));

   var game = await dbCollection.FindAsync<Game>(eqFilter).ConfigureAwait(false);

   return Ok(game.FirstOrDefault());
}
See, they’re almost identical: the only difference is that now we’re wrapping our id variable within an ObjectId object, which will then be used as a filter by MongoDB.
Get with complex filters
Now I’m interested only in games I can play with 3 friends, so all the games whose minimum number of players is less than 4 and whose max number of players is greater than 4.
To achieve this result we can rely on other kinds of filters, that can also be nested.
First of all, we’ll use Lte to specify a less than or equal filter; then we’ll use Gte to create a greater than or equal filter.
Finally, we’ll join them in an and condition with the And method.
[HttpGet]
[Route("byplayers/{players}")]
public async Task<ActionResult> GetByName(int players)
{
   var filter = Builders<Game>.Filter;
   var minNumberFilter = filter.Lte(x => x.MinNumberOfPlayers, players);
   var maxNumberFilter = filter.Gte(x => x.MaxNumberOfPlayers, players);

   var finalFilter = filter.And(minNumberFilter, maxNumberFilter);

   var game = await dbCollection.FindAsync<Game>(finalFilter).ConfigureAwait(false);
   return Ok(game.ToList());
}
If we peek into the definition of the And method, we see this:
public FilterDefinition<TDocument> And(IEnumerable<FilterDefinition<TDocument>> filters);
public FilterDefinition<TDocument> And(params FilterDefinition<TDocument>[] filters);
This means that we can add as many filters we want in the And clause, and we can even create them dynamically by adding them to an IEnumerable of FilterDefinition object.
Of course, the same applies to the Or clause.
Update
Now, it’s time to update an existing field. To keep the example simple, I chose to update only the game name given its Id.
[HttpPatch]
public async Task<ActionResult> Update([FromQuery] string gameId, [FromQuery] string newName)
{
   FilterDefinitionBuilder<Game> eqfilter = Builders<Game>.Filter;
   FilterDefinition<Game> eqFilterDefinition = eqfilter.Eq(x => x.AnotherId, gameId);

   UpdateDefinitionBuilder<Game> updateFilter = Builders<Game>.Update;
   UpdateDefinition<Game> updateFilterDefinition = updateFilter.Set(x => x.Name, newName);

   UpdateResult updateResult = await dbCollection.UpdateOneAsync(eqFilterDefinition, updateFilterDefinition).ConfigureAwait(false);

   if (updateResult.ModifiedCount > 0)
   {
         return Ok();
   }
   else
   {
         return BadRequest();
   }
}
Let me explain it step by step.
FilterDefinitionBuilder<Game> eqfilter = Builders<Game>.Filter;
FilterDefinition<Game> eqFilterDefinition = eqfilter.Eq(x => x.AnotherId, gameId);
You already know these lines. I have nothing more to add.
UpdateDefinitionBuilder<Game> updateFilter = Builders<Game>.Update;
UpdateDefinition<Game> updateFilterDefinition = updateFilter.Set(x => x.Name, newName);
Here we are creating a new object that will build our Update operation, the UpdateDefinitionBuilder<Game>, and creating the rule to apply in order to update the record.
It’s important to see the clear separation of concerns: with one builder, you define which items must be updated, while with the second one you define how those items must be updated.
Finally, we can apply the changes:
UpdateResult updateResult = await dbCollection.UpdateOneAsync(eqFilterDefinition, updateFilterDefinition).ConfigureAwait(false);
We are now performing the update operation on the first item that matches the rules defined by the eqFilterDefinition filter. You can of course create a more complex filter definition by using the other constructs that we’ve already discussed.
The returned value is an UpdateResult object, which contains a few fields that describe the status of the operation. Among them, we can see MatchedCount and ModifiedCount.
Delete
The last operation to try is the delete.
It is similar to the other operations:
[HttpDelete]
public async Task<ActionResult> Delete([FromQuery] string gameId)
{
   FilterDefinitionBuilder<Game> filter = Builders<Game>.Filter;
   FilterDefinition<Game> eqFilter = filter.Eq(x => x.AnotherId, gameId);

   DeleteResult res = await dbCollection.DeleteOneAsync(eqFilter).ConfigureAwait(false);

   if (res.DeletedCount > 0)
   {
         return Ok();
   }
   else
   {
         return BadRequest();
   }
}
As usual, to find the items to be deleted we must create the correct FilterDefinition. Then we can execute the DeleteOneAsync method to delete the first one, and finally check how many items have been deleted by accessing the properties exposed by the DeleteResult object.
Conclusion
We’ve seen how to perform some simple operations with C# and MongoDB by creating filters on the collections and performing actions on them.
For most of the methods I used here actually there are different versions to allow both synchronous and asynchronous operations, and to perform operations both on a single and on multiple items. An example is the update operation: depending on your necessities, you can perform UpdateOne, UpdateOneAsync, UpdateMany, UpdateManyAsync.
If you want to have a broader knowledge of how you can use C# to perform operations on MongoDB, you can refer to this MongoDB C# driver cheat sheet which is very complete, but not updated. This article uses operations that now are outdated, like Query<Product>.EQ(p => p.Item, "pen") that has been updated to Builders<Game>.Filter.Eq(p => p.Item, "pen"). By the way, even if that article was published in 2014, it’s still a great resource.
If you prefer a deeper and up-to-date resource, the best thing is to head to the official documentation where you can find lots of examples each with a short explanation.
As usual, you can find the repository I used for this example on GitHub.
Happy coding!


