

How to perform CRUD operations with Entity Framework Core and PostgreSQL
With Entity Framework you can perform operations on relational databases without writing a single line of SQL. We will use EF to integrate PostgreSQL in our application
Table of Contents
Just a second! 🫷
If you are here, it means that you are a software developer. So, you know that storage, networking, and domain management have a cost .
If you want to support this blog, please ensure that you have disabled the adblocker for this site. I configured Google AdSense to show as few ADS as possible - I don't want to bother you with lots of ads, but I still need to add some to pay for the resources for my site.
Thank you for your understanding.
- Davide
When working with relational databases, you often come across two tasks: writing SQL queries and mapping the results to some DTO objects.
.NET developers are lucky to have an incredibly powerful tool that can speed up their development: Entity Framework. Entity Framework (in short: EF) is an ORM built with in mind simplicity and readability.
In this article, we will perform CRUD operations with Entity Framework Core on a database table stored on PostgreSQL.
Introduction EF Core
With Entity Framework you don’t have to write SQL queries in plain text: you write C# code that gets automatically translated into SQL commands. Then the result is automatically mapped to your C# classes.
Entity Framework supports tons of database engines, such as SQL Server, MySQL, Azure CosmosDB, Oracle, and, of course, PostgreSQL.
There are a lot of things you should know about EF if you’re new to it. In this case, the best resource is its official documentation.
But the only way to learn it is by getting your hands dirty. Let’s go!
How to set up EF Core
For this article, we will reuse the same .NET Core repository and the same database table we used when we performed CRUD operations with Dapper (a lightweight OR-M) and with NpgSql, which is the library that performs bare-metal operations.
The first thing to do is, as usual, install the related NuGet package. Here we will need Npgsql.EntityFrameworkCore.PostgreSQL. Since I’ve used .NET 5, I have downloaded version 5.0.10.

Then, we need to define and configure the DB Context.
Define and configure DbContext
The idea behind Entity Framework is to create DB Context objects that map database tables to C# data sets. DB Contexts are the entry point to the tables, and the EF way to work with databases.
So, the first thing to do is to define a class that inherits from DbContext:
public class BoardGamesContext : DbContext
{

}
Within this class we define one or more DbSets, that represent the collections of data rows on their related DB table:
public DbSet<BoardGame> Games { get; set; }
Then we can configure this specific DbContext by overriding the OnConfiguring method and specifying some options; for example, you can specify the connection string:
protected override void OnConfiguring(DbContextOptionsBuilder optionsBuilder)
{
    optionsBuilder.UseNpgsql(CONNECTION_STRING);
    base.OnConfiguring(optionsBuilder);
}
Remember to call base.OnConfiguring! Otherwise some configurations will not be applied, and the system may not work.
Also, pay attention to the Port in the connection string! While with other libraries you can define it as
private const string CONNECTION_STRING = "Host=localhost:5455;" +
    "Username=postgresUser;" +
    "Password=postgresPW;" +
    "Database=postgresDB";
Entity Framework core requires the port to be specified in a different field:
private const string CONNECTION_STRING = "Host=localhost;"+
            "Port=5455;" + // THIS!!!!!
            "Username=postgresUser;" +
            "Password=postgresPW;" +
            "Database=postgresDB";
If you don’t explicitly define the Port, EF Core won’t recognize the destination host.
Then, we can configure the models mapped to DB tables by overriding OnModelCreating:
protected override void OnModelCreating(ModelBuilder modelBuilder)
{
    modelBuilder.Entity<BoardGame>(e => e.ToTable("games"));
    base.OnModelCreating(modelBuilder);
}
Here we’re saying that the rows in the games table will be mapped to BoardGame objects. We will come back to it later.
For now, we’re done; here’s the full BoardGamesContext class:
public class BoardGamesContext : DbContext
{
    public DbSet<BoardGame> Games { get; set; }

    protected override void OnConfiguring(DbContextOptionsBuilder optionsBuilder)
    {
        optionsBuilder.UseNpgsql(CONNECTION_STRING);
        base.OnConfiguring(optionsBuilder);
    }
    private const string CONNECTION_STRING = "Host=localhost;Port=5455;" +
                "Username=postgresUser;" +
                "Password=postgresPW;" +
                "Database=postgresDB";

    protected override void OnModelCreating(ModelBuilder modelBuilder)
    {
        modelBuilder.Entity<BoardGame>(e => e.ToTable("games"));
        base.OnModelCreating(modelBuilder);
    }
}
Add the DbContext to Program
Now that we have the BoardGamesContext ready we have to add its reference in the Startup class.
In the ConfigureServices method, add the following instruction:
services.AddDbContext<BoardGamesContext>();
With this instruction, you make the BoardGamesContext context available across the whole application.
You can further configure that context using an additional parameter of type Action<DbContextOptionsBuilder>. In this example, you can skip it, since we’ve already configured the BoardGamesContext using the OnConfiguring method. They are equivalent.
If you don’t like
protected override void OnConfiguring(DbContextOptionsBuilder optionsBuilder)
{
    optionsBuilder.UseNpgsql(CONNECTION_STRING);
    base.OnConfiguring(optionsBuilder);
}
you can do
services.AddDbContext<BoardGamesContext>(
    optionsBuilder => optionsBuilder.UseNpgsql(CONNECTION_STRING)
);
The choice is yours!
Define and customize the DB Model
As we know, EF allows you to map DB rows to C# objects. So, we have to create a class and configure it in a way that allows EF Core to perform the mapping.
Here we have the BoardGame class:
public class BoardGame
{
    [System.ComponentModel.DataAnnotations.Key]
    public int Id { get; set; }

    public string Name { get; set; }

    public int MinPlayers { get; set; }

    public int MaxPlayers { get; set; }

    public int AverageDuration { get; set; }
}
Notice that we’ve explicitly declared that Id is the primary key in the table.
But it’s not enough! This way the code won’t work! 😣
Have a look at the table on Postgres:
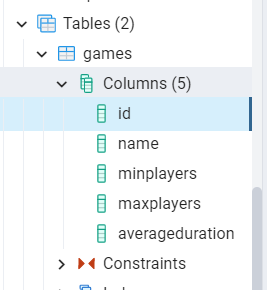
Have you noticed it? Postgres uses lowercase names, but we are using CamelCase. C# names must be 100% identical to those in the database!
Now we have two ways:
➡ Rename all the C# properties to their lowercase equivalent
public class BoardGame
{
    [System.ComponentModel.DataAnnotations.Key]
    public int id { get; set; }
    public string name { get; set; }
    /// and so on
}
➡ decorate all the properties with the Column attribute.
public class BoardGame
{
    [System.ComponentModel.DataAnnotations.Key]
    [Column("id")]
    public int Id { get; set; }

    [Column("name")]
    public string Name { get; set; }

    [Column("minplayers")]
    public int MinPlayers { get; set; }

    [Column("maxplayers")]
    public int MaxPlayers { get; set; }

    [Column("averageduration")]
    public int AverageDuration { get; set; }
}
Using the Column attribute is useful also when the DB column names and the C# properties differ for more than just the case, like in:
[Column("averageduration")]
public int AvgDuration { get; set; }
Is it enough? Have a look again at the table definition:
Noticed the table name? It’s “games”, not “BoardGame”!
We need to tell EF which is the table that contains BoardGame objects.
Again, we have two ways:
➡ Override the OnModelCreating method in the BoardGamesContext class, as we’ve seen before:
protected override void OnModelCreating(ModelBuilder modelBuilder)
{
    modelBuilder.Entity<BoardGame>(e => e.ToTable("games"));
    base.OnModelCreating(modelBuilder);
}
➡ Add the Table attribute to the BoardGame class:
[Table("games")]
public class BoardGame
{...}
Again, the choice is yours.
CRUD operations with Entity Framework
Now that the setup is complete, we can perform our CRUD operations. Entity Framework simplifies a lot the way to perform such types of operations, so we can move fast in this part.
There are two main points to remember:
- to access the context we have to create a new instance of
BoardGamesContext, which should be placed into ausingblock. - When performing operations that change the status of the DB (insert/update/delete rows), you have to explicitly call
SaveChangesorSaveChangesAsyncto apply those changes. This is useful when performing batch operations on one or more tables (for example, inserting an order in the Order table and updating the user address in the Users table).
Create
To add a new BoardGame, we have to initialize the BoardGamesContext context and add a new game to the Games DbSet.
public async Task Add(BoardGame game)
{
    using (var db = new BoardGamesContext())
    {
        await db.Games.AddAsync(game);
        await db.SaveChangesAsync();
    }
}
Read
If you need a specific entity by its id you can use Find and FindAsync.
public async Task<BoardGame> Get(int id)
{
    using (var db = new BoardGamesContext())
    {
        return await db.Games.FindAsync(id);
    }
}
Or, if you need all the items, you can retrieve them by using ToListAsync
public async Task<IEnumerable<BoardGame>> GetAll()
{
    using (var db = new BoardGamesContext())
    {
        return await db.Games.ToListAsync();
    }
}
Update
Updating an item is incredibly straightforward: you have to call the Update method, and then save your changes with SaveChangesAsync.
public async Task Update(int id, BoardGame game)
{
    using (var db = new BoardGamesContext())
    {
        db.Games.Update(game);
        await db.SaveChangesAsync();

    }
}
For some reason, EF does not provide an asynchronous way to update and remove items. I suppose that it’s done to prevent or mitigate race conditions.
Delete
Finally, to delete an item you have to call the Remove method and pass to it the game to be removed. Of course, you can retrieve that game using FindAsync.
public async Task Delete(int id)
{
    using (var db = new BoardGamesContext())
    {
        var game = await db.Games.FindAsync(id);
        if (game == null)
            return;

        db.Games.Remove(game);
        await db.SaveChangesAsync();
    }
}
Further readings
Entity Framework is impressive, and you can integrate it with tons of database vendors. In the link below you can find the full list. But pay attention that not all the libraries are implemented by the EF team, some are third-party libraries (like the one we used for Postgres):
🔗 Database Providers | Microsoft docs
If you want to start working with PostgreSQL, a good way is to download it as a Docker image:
🔗 How to run PostgreSQL locally with Docker | Code4IT
Then, if you don’t like Entity Framework, you can perform CRUD operations using the native library, NpgSql:
🔗 CRUD operations on PostgreSQL using C# and Npgsql | Code4IT
or, maybe, if you prefer Dapper:
🔗 PostgreSQL CRUD operations with C# and Dapper | Code4IT
Finally, you can have a look at the full repository here:
🔗 Repository used for this article | GitHub
This article first appeared on Code4IT 🐧
Wrapping up
This article concludes the series that explores 3 ways to perform CRUD operations on a Postgres database with C#.
In the first article, we’ve seen how to perform bare-metal queries using NpgSql. In the second article, we’ve used Dapper, which helps mapping queries results to C# DTOs. Finally, we’ve used Entity Framework to avoid writing SQL queries and have everything in place.
Which one is your favorite way to query relational databases?
What are the pros and cons of each approach?
I hope you enjoyed this article! Let's keep in touch on LinkedIn, Twitter or BlueSky! 🤜🤛
Happy coding!
🐧