
How to send Slack messages using Azure Logic Apps: built-in connector vs Slack APIs
As you may know, you can send Slack notifications using Azure Logic Apps. Yes, there is a built-in connector; but, frankly, using the Slack API gives you better results.
Table of Contents
Just a second! 🫷
If you are here, it means that you are a software developer. So, you know that storage, networking, and domain management have a cost .
If you want to support this blog, please ensure that you have disabled the adblocker for this site. I configured Google AdSense to show as few ADS as possible - I don't want to bother you with lots of ads, but I still need to add some to pay for the resources for my site.
Thank you for your understanding.
- Davide
You all know Slack, the popular messaging platform for teams. And maybe you also know Azure Logic Apps, the cloud service for building automated workflows on Azure.
But did you know that you can send messages to Slack channels directly from Azure Logic Apps? Yeah, a built-in connector already exists, but, in my opinion, it’s not that good. I think that, for slightly more advanced scenarios, using the Slack API instead is a much better choice.
In this article, we will explore two ways to send Slack messages from an Azure Logic App:
- The built-in Slack connector: the quick, low-config option, which is great for simple messages, but with limitations.
- The Slack API via HTTP action: the flexible, more powerful option; it requires more setup, but the effort will let you send rich, beautifully formatted messages using Slack’s Block Kit.
Prerequisites for trying out the examples
To follow along with the examples in this article, you will need:
- An Azure subscription to create Logic Apps. Ideally, you might want to use Azure Key Vault to store secrets.
- A Slack workspace where you have permissions to create apps and post messages. You can use a free workspace for testing.
Nothing more is needed! We are not even going to write any code - just configuration and JSON payloads.
How to send Slack messages with the built-in Azure Logic App connector
Azure Logic Apps provides a native Slack connector that gets you up and running quickly. It abstracts away authentication and gives you a simple interface to post messages without writing a single line of code.
Let’s see how it works and its limitations.
How to add the Slack connector to a Logic App
Open your Logic App in the Azure Portal and navigate to the designer. Click on Add an action and search for “Slack”. You should see the Slack connector appear in the list.
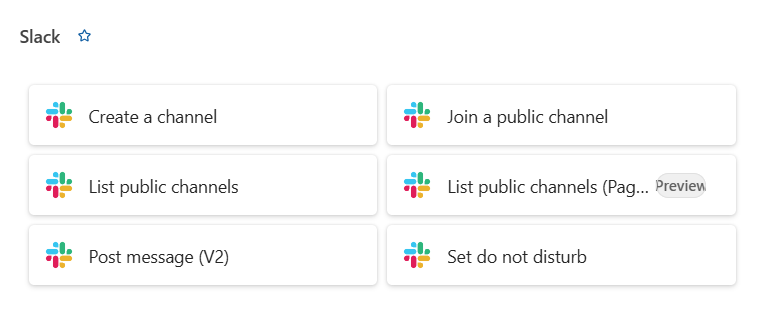
After selecting the Slack connector, you will be presented with a list of available actions. The most commonly used ones are:
- Post message (V2): post a text message to a channel.
- Create channel: creates a new channel in the workspace.
- List channels: retrieves the list of channels in the workspace.
For our notifications, we will focus on Post message (V2).
How to configure the Slack connection
Before configuring the action, you need to authenticate the connector with your Slack workspace.
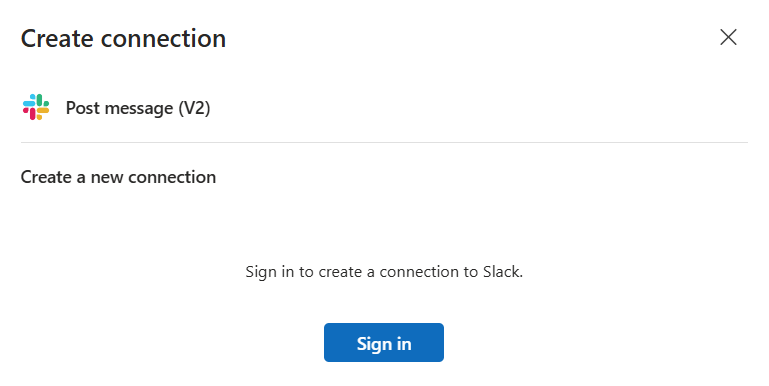
Clicking “Sign in” opens an OAuth authorization page from Slack. You will be asked to grant the Logic App access to your workspace.
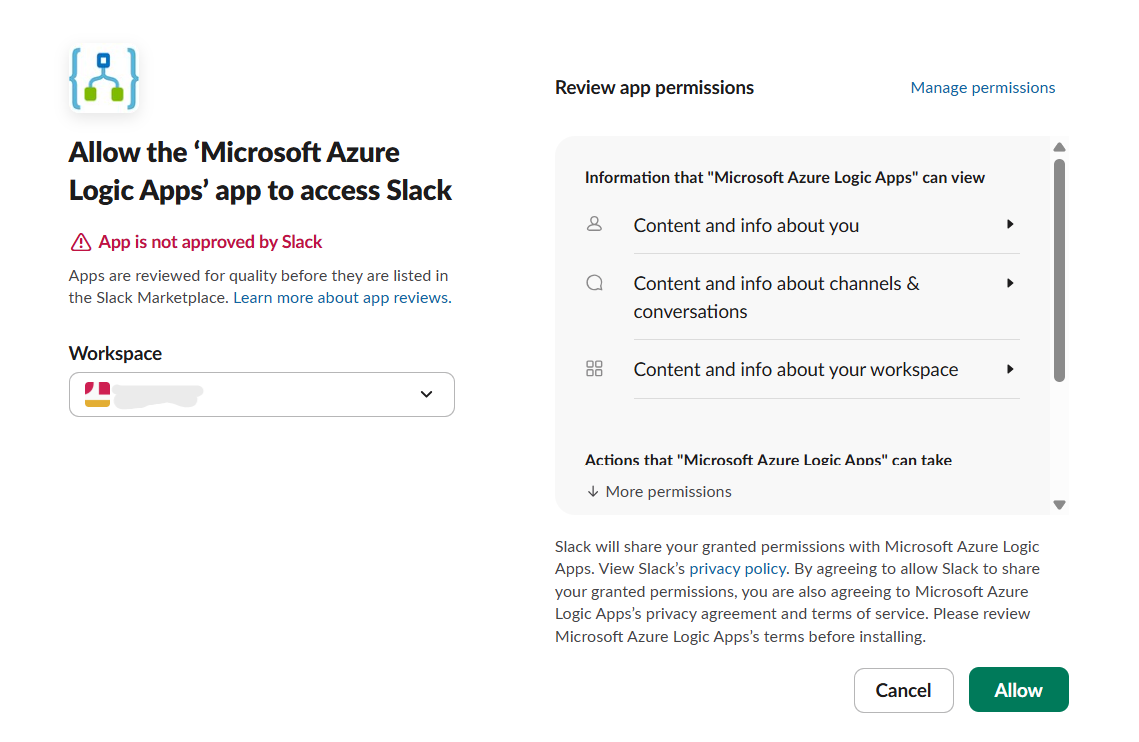
Once you click Allow, the connection is created and stored as a managed connection in Azure.
How to configure the “Post message (V2)” action
Once connected, the action exposes a simple form with the following fields:
- Channel Name: The Slack channel to post to (e.g.,
#code4it-article). - Message Text : The content of the message.
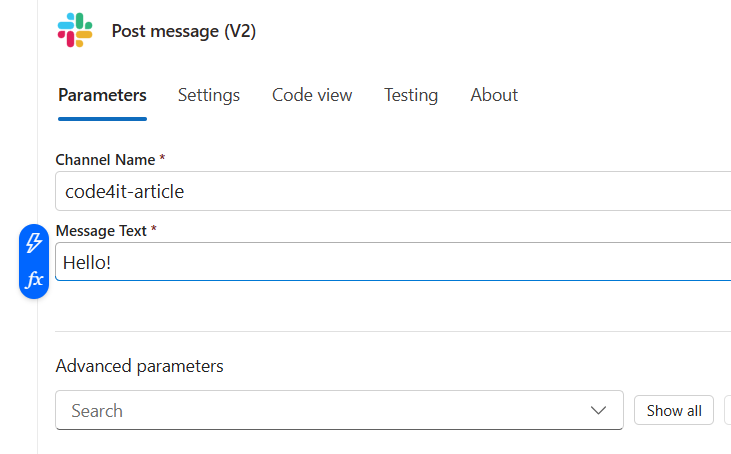
You can use dynamic content from previous steps in the flow, making the message content dynamic based on the data processed by the Logic App.
Limitations of the built-in Slack connector
The built-in connector is convenient, but it comes with notable limitations that you should be aware of.
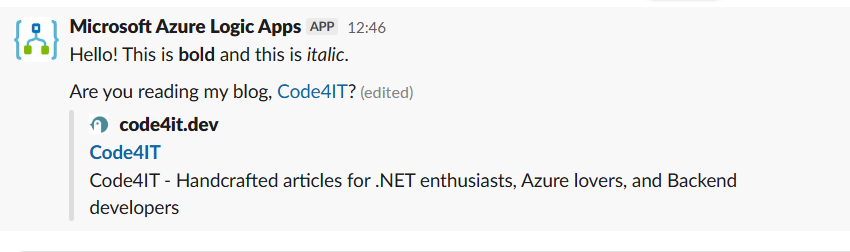
First of all, the message format is limited. You can use basic Slack markdown (e.g., *bold*, _italic_, ~strikethrough~, <URL|link text>), but nothing more.
For example, the following text will work:
Hello! This is *bold* and this is _italic_.

Are you reading my blog, <https://www.code4it.dev|Code4IT>?
and will show the following message in Slack:
Tables, dividers, context blocks, and interactive elements are not supported.
You also have to take care of rate limits and reliability. In fact, the connector does not expose any retry policy configuration by default. For high-throughput automation, you may encounter Slack API rate limits without a clear way to handle them within the connector itself.
Finally, with the built-in connector it may become cumbersome to understand what happened when there was an error. If the message fails to send, the Logic App action will fail. However, the error messages are not always descriptive enough to diagnose the problem quickly.
Posting rich Slack messages via the Slack API: a more powerful alternative
To post messages with full formatting control and interactive components, we need to use the Slack APIs.
Given that they are “simple” APIs, we can use the HTTP action of Azure Logic Apps, which lets us call any REST endpoint.
But before we can make API calls, we need to create a Slack App and obtain an API token with the right permissions.
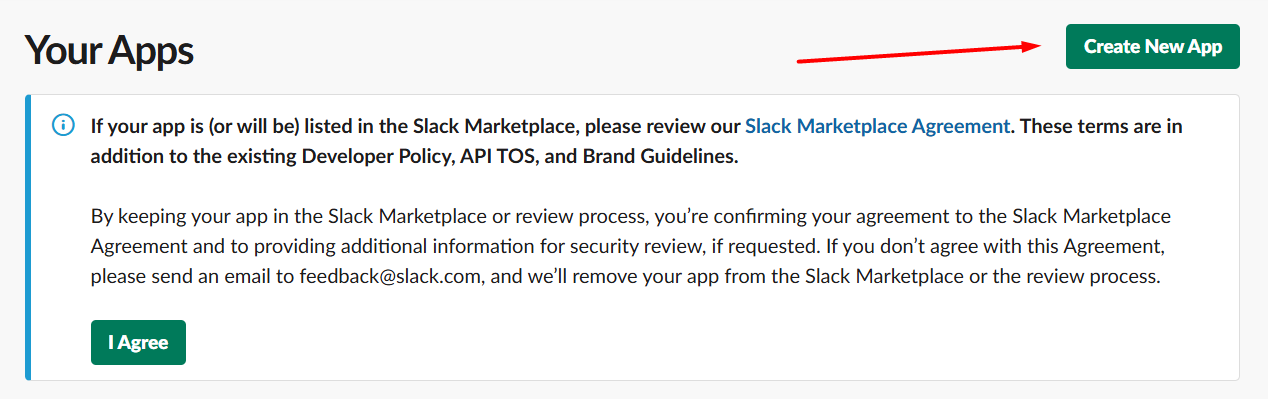
How to create a Slack App
In Slack, an App is a container for your bot, its permissions, and its configuration.
To create one, go to https://api.slack.com/apps and click “Create New App”.
If you choose “From scratch”, you will be asked to fill in the required details:
- App Name: something recognizable, like
Board Game Bot. - Development Slack Workspace: select the Slack workspace where you want to install the app.
Once you click Create App, you’ll be able to use and configure it.
How to configure the Bot and its permissions
Once the app is created, you will land on the App’s configuration page. Navigate to “OAuth & Permissions” in the left menu.
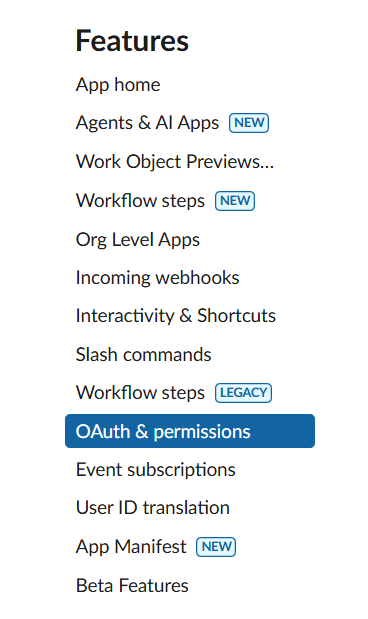
Scroll down to the “Scopes” section. In the Bot Token Scopes section you can define what the bot is allowed to do. For posting messages, you need to add the chat:write permission, which allows the bot to post messages to channels it is a member of.
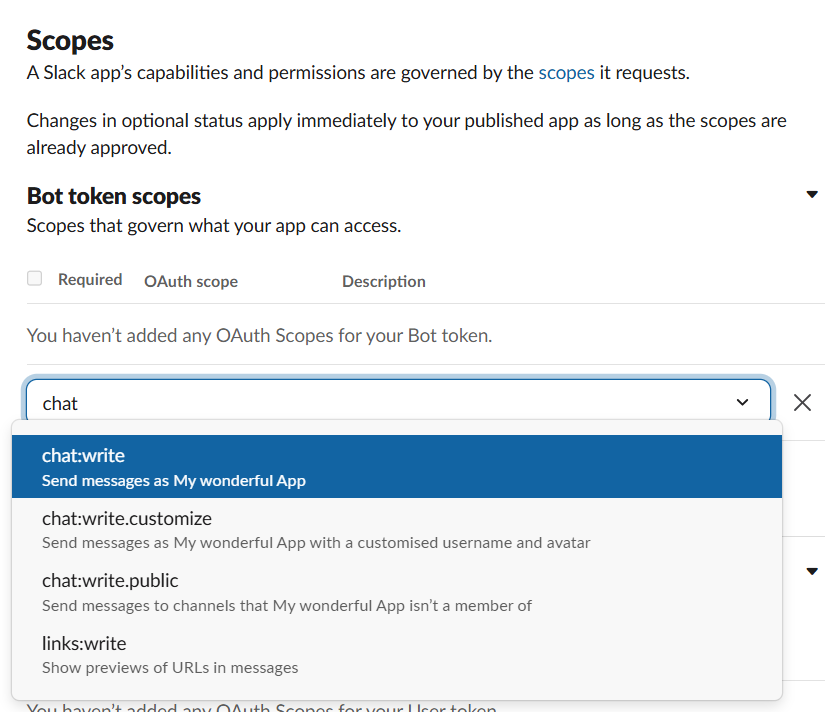
Adding chat:write.public is optional but convenient. Without it, you need to explicitly invite the bot to every channel it needs to post in.
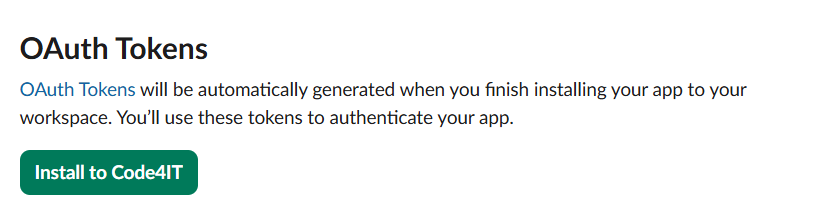
After adding the scopes, scroll back up and click “Install to Workspace”.
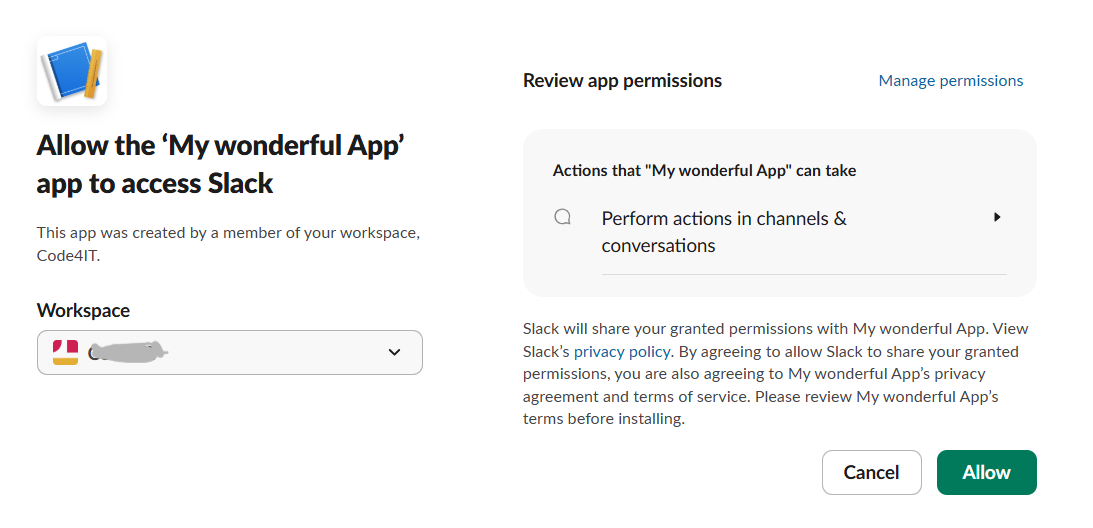
Slack will ask you to confirm the permissions.
After installation, you will see a Bot User OAuth Token on the “OAuth & Permissions” page. A Slack Oauth Token typically starts with xoxb-.
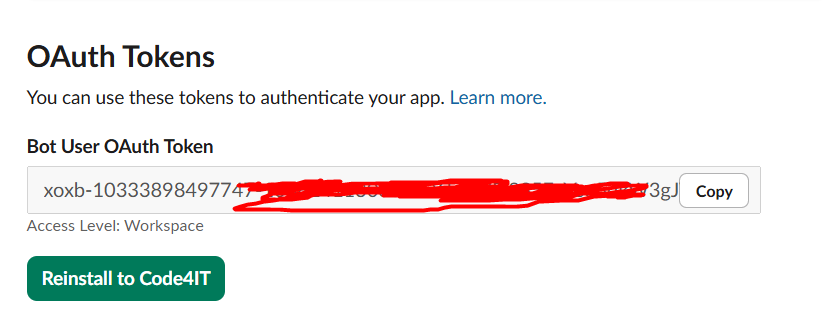
Copy this token and store it securely - you will need it in the Logic App. A good place to store it is in an Azure Key Vault secret, so that the token is never hardcoded in the Logic App definition.
How to add a Slack bot to a target channel
Just having the bot is not enough: you also need to add the bot to the channel where you want to post messages.
So, open the channel in Slack, type /add and select “Add apps to this channel”.
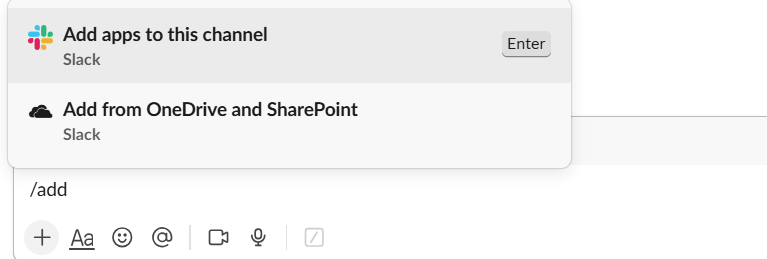
Then search for your bot (e.g., My Wonderful App) and add it.
How to design rich messages using Slack Block Kit
Slack’s Block Kit is a UI framework for building rich, structured messages. A Block Kit message is a JSON payload made up of blocks - each block represents a distinct piece of content.
The available block types include:
| Block type | Description |
|---|---|
section |
A text block, optionally with a side image or button. |
header |
A large, bold heading. |
divider |
A horizontal line separating content. |
context |
Small supplementary text, typically shown in a smaller font. |
image |
A standalone image block. |
actions |
A row of interactive buttons or other elements. |
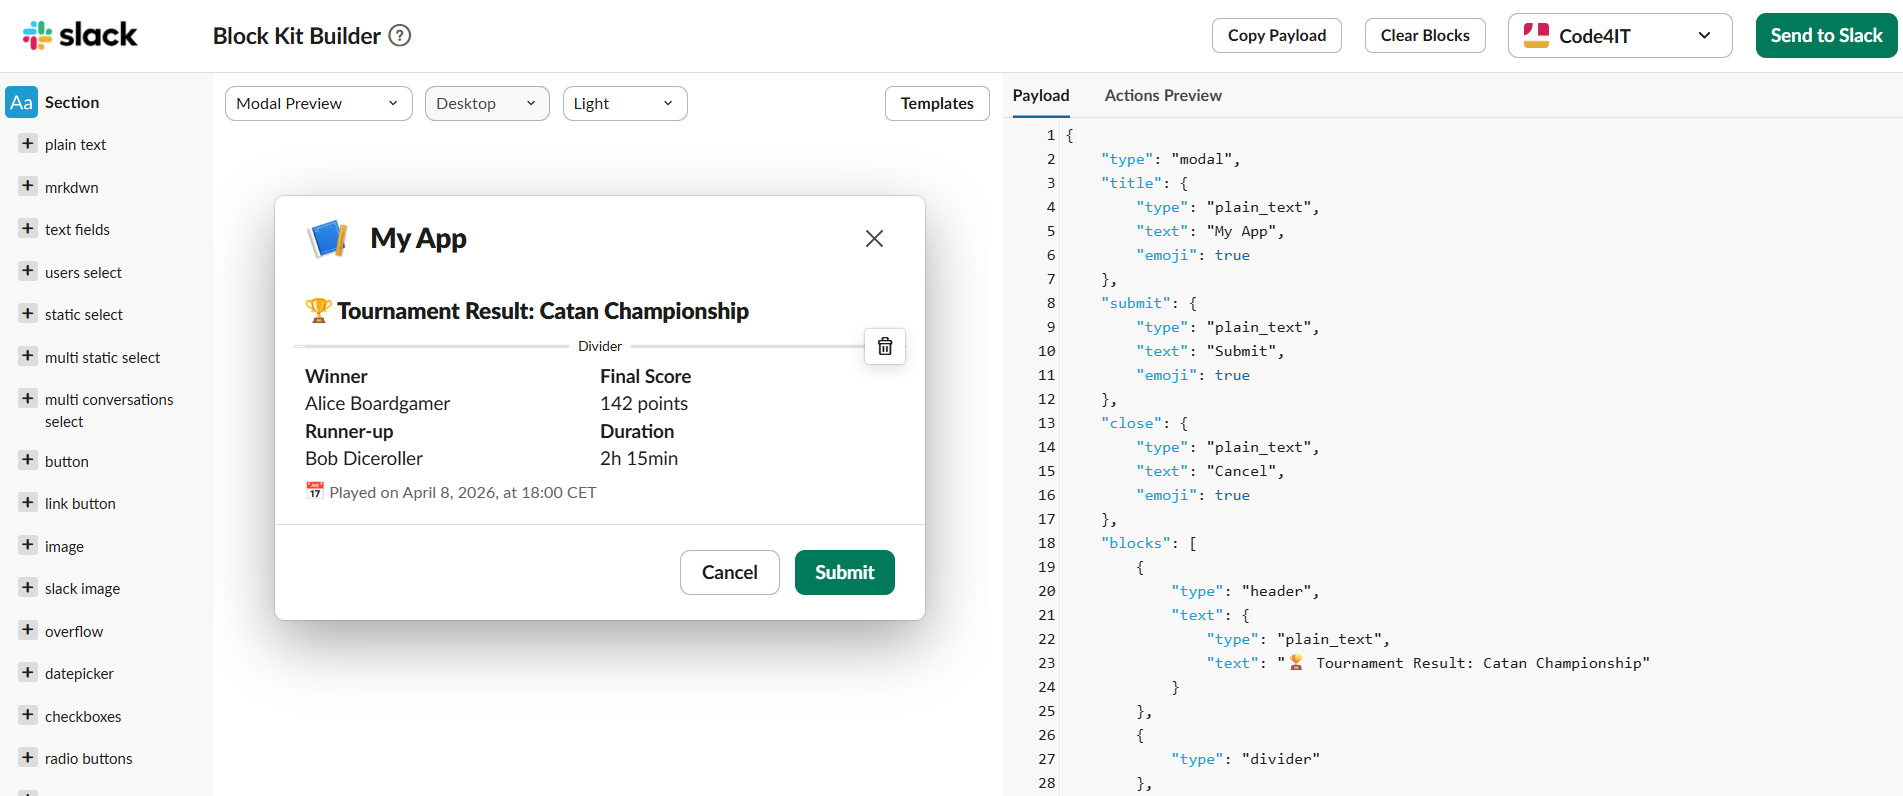
Let’s build a rich notification for a tournament result. The message will include:
- A
headerblock with the tournament name - A
dividerblock to separate the title from the details - A
sectionblock with the winner, final score, runner-up, and duration - A
contextblock showing when the match was played
Here is the JSON payload:
{
  "channel": "#my-channel-name",
  "blocks": [
    {
      "type": "header",
      "text": {
        "type": "plain_text",
        "text": "🏆 Tournament Result: Catan Championship"
      }
    },
    {
      "type": "divider"
    },
    {
      "type": "section",
      "fields": [
        {
          "type": "mrkdwn",
          "text": "*Winner*\nAlice Boardgamer"
        },
        {
          "type": "mrkdwn",
          "text": "*Final Score*\n142 points"
        },
        {
          "type": "mrkdwn",
          "text": "*Runner-up*\nBob Diceroller"
        },
        {
          "type": "mrkdwn",
          "text": "*Duration*\n2h 15min"
        }
      ]
    },
    {
      "type": "context",
      "elements": [
        {
          "type": "mrkdwn",
          "text": "📅 Played on April 8, 2026, at 18:00 CET"
        }
      ]
    }
  ]
}
You can preview and iterate on your layout using the Slack Block Kit Builder website, an interactive sandbox available at https://app.slack.com/block-kit-builder.
An important note: the channel field in the payload can be either the channel name (e.g., #general) or the channel ID (e.g., C12345678). Using the channel ID is more reliable, especially if you have channels with similar names. However, you cannot add it in the Block Kit Builder editor, as it is not a recognized field in the Block Kit schema. You will need to add it manually in the JSON after designing the message.
How to post rich message from Azure Logic Apps using the Slack API
Now let’s wire everything together in a Logic App. We will use the HTTP action to call https://slack.com/api/chat.postMessage.
In the Logic App designer, add an HTTP action. Configure it as follows:
| Field | Value |
|---|---|
| URI | https://slack.com/api/chat.postMessage |
| Method | POST |
| Content-Type Header | application/json |
| Authorization Header | Bearer xoxb-your-bot-token. Don’t forget to add Bearer as part of the header value! |
| Body | The Block Kit JSON payload, with the Channel ID |
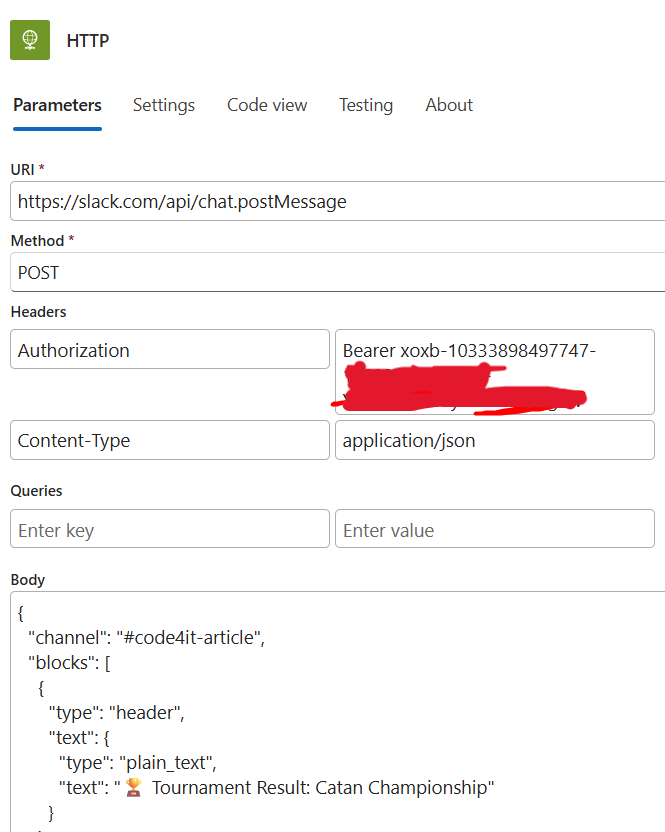
Security tip: Never hardcode the bot token in the Logic App definition (as I did in the screenshot above). Instead, retrieve it at runtime from an Azure Key Vault secret. You can do this by adding a “Get secret” action from the Azure Key Vault connector before the HTTP call, and then using the body('Get_secret')?['value'] dynamic value in the Authorization header.
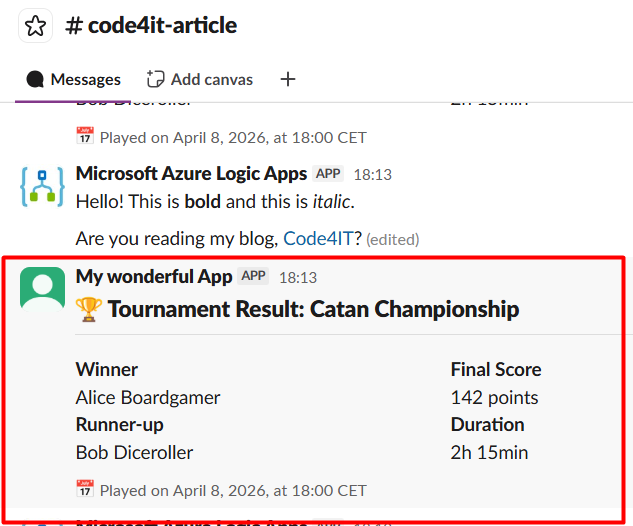
When the Logic App runs, the HTTP action posts the Block Kit payload to the Slack API. Slack returns a JSON response indicating whether the call succeeded.
In the meantime, you can see the message pop up in the target Slack channel, beautifully formatted with headers, sections, and context blocks.
How to handle the Slack API response
The chat.postMessage endpoint always returns HTTP 200 - even when the message fails to send (well, except for cases like Too Many Requests or Bad Requests…). The actual success or failure is indicated by the ok field in the response body:
{
  "ok": true,
  "channel": "C12345678",
  "ts": "1712345678.123456",
  "message": { ... }
}
If something went wrong (for example, an invalid channel or an expired token), the response looks like this:
{
  "ok": false,
  "error": "channel_not_found"
}
To handle this scenario in Logic Apps, add a Condition action after the HTTP call to check body('HTTP')?['ok']. If it is false, you can log the error, send an alert, or trigger a retry.
Bonus: Injecting dynamic content into the Block Kit payload
In real-world scenarios, the message content is not static - it comes from earlier steps in the Logic App. You can construct the JSON body dynamically using Logic Apps expressions.
For example, if a previous step in your Logic App returns the tournament data as a JSON object, you can build the Block Kit payload using string interpolation.
In Azure Logic Apps, dynamic values are referenced with the @{...} syntax. The ? operator is the safe-navigation operator, equivalent to the ?. operator in C# - it prevents a null-reference error if the property doesn’t exist. For example, @{triggerBody()?['tournamentName']} reads the tournamentName property from the trigger payload without throwing an error if that field is missing.
Here is how the dynamic Block Kit payload looks:
{
  "channel": "#my-channel-name",
  "blocks": [
    {
      "type": "header",
      "text": {
        "type": "plain_text",
        "text": "🏆 Tournament Result: @{triggerBody()?['tournamentName']}"
      }
    },
    // same as before...
  ]
}
You can use the @{...} syntax anywhere in the body field, mixing static JSON with dynamic values from earlier steps.
Built-in connector vs Slack API: a recap table
Here is a side-by-side comparison of the two approaches, as a quick reference:
| Feature | Built-in Connector | Slack API (HTTP action) |
|---|---|---|
| Setup complexity | Low | Medium |
| Authentication | OAuth (user account) | Bot token (service account) |
| Sender identity | Real user | Bot with custom name/avatar |
| Message formatting | Plain text + basic Markdown | Full Block Kit support |
| Interactive components | ❌ Not supported | ✅ Supported |
| Token management | Managed by Azure | Manual (recommend Key Vault) |
| Portability | Azure Logic Apps only | Works anywhere |
| Rate limit handling | Not configurable | Fully configurable |
| Best for | Quick prototypes | Production integrations |
So, yeah, we saw that the built-in connector has some significant limitations, but it can still be a good choice for certain scenarios.
In fact, it is perfectly fine when:
- You need a quick proof-of-concept or internal tool.
- The messages are simple text notifications.
- You don’t need interactive components or rich formatting.
For anything more demanding, I think that the Slack API approach is far more appropriate.
Further readings
Azure Logic Apps is a powerful platform that integrates with a wide range of services. If you want to explore more automation possibilities, you may find these articles helpful.
First of all, what is an Azure Logic App? Here is a great introduction to the service:
🔗 What is Azure Logic Apps? | Microsoft docs
And how can we improve security by storing secrets in Azure Key Vault? This article has you covered:
🔗 Azure Key Vault connector reference for Azure Logic Apps | Microsoft docs
This article first appeared on Code4IT 🐧
Then, what about Slack’s connector? Here is the official documentation:
🔗 Slack connector reference for Azure Logic Apps | Microsoft docs
To learn more about Slack’s Block Kit and the chat.postMessage API, refer to the official documentation:
🔗 Slack Block Kit reference | Slack API docs
🔗 chat.postMessage method | Slack API docs
Finally, a real use case. This article of mine is a little old, but it gives a good overview of how I used to automate a blogging workflow using GitHub, PowerShell, and Azure services:
Wrapping up
In this article, we learned two ways to send messages to Slack from Azure Logic Apps.
The built-in Slack connector is the easiest path: add the connector, sign in with OAuth, pick a channel, and type a message. It is perfect for quick internal tools and simple notifications. However, the messages appear under a user account rather than a bot, and there is no support for rich formatting.
The Slack API approach via the HTTP action gives you the full power of Slack’s Block Kit: headers, sections, fields, dividers, context blocks, and even interactive buttons. It requires a bit more setup - creating a Slack App, configuring scopes, and generating a bot token - but the result is a professional, branded, and fully formatted notification experience.
For a board game community sending tournament updates, player registrations, and game results to a Slack channel, the API approach delivers a far better experience and is worth the extra upfront investment.
I hope you enjoyed this article! Let's keep in touch on LinkedIn, Twitter or BlueSky! 🤜🤛
Happy coding!
🐧