
Advanced Integration Tests for .NET 7 API with WebApplicationFactory and NUnit
Integration Tests are incredibly useful: a few Integration Tests are often more useful than lots of Unit Tests. Let’s learn some advanced capabilities of
WebApplicationFactory.
Table of Contents
Just a second! 🫷
If you are here, it means that you are a software developer. So, you know that storage, networking, and domain management have a cost .
If you want to support this blog, please ensure that you have disabled the adblocker for this site. I configured Google AdSense to show as few ADS as possible - I don't want to bother you with lots of ads, but I still need to add some to pay for the resources for my site.
Thank you for your understanding.
- Davide
In a previous article, we learned a quick way to create Integration Tests for ASP.NET API by using WebApplicationFactory. That was a nice introductory article. But now we will delve into more complex topics and examples.
In my opinion, a few Integration Tests and just the necessary number of Unit tests are better than hundreds of Unit Tests and no Integration Tests at all. In general, the Testing Diamond should be preferred over the Testing Pyramid (well, in most cases).
In this article, we are going to create advanced Integration Tests by defining custom application settings, customizing dependencies to be used only during tests, defining custom logging, and performing complex operations in our tests.
For the sake of this article, I created a sample API application that exposes one single endpoint whose purpose is to retrieve some info about the URL passed in the query string. For example,
GET /SocialPostLink?uri=https%3A%2F%2Ftwitter.com%2FBelloneDavide%2Fstatus%2F1682305491785973760
will return
{
  "instanceName": "Real",
  "info": {
    "socialNetworkName": "Twitter",
    "sourceUrl": "https://twitter.com/BelloneDavide/status/1682305491785973760",
    "username": "BelloneDavide",
    "id": "1682305491785973760"
  }
}
For completeness, instanceName is a value coming from the appsettings.json file, while info is an object that holds some info about the social post URL passed as input.
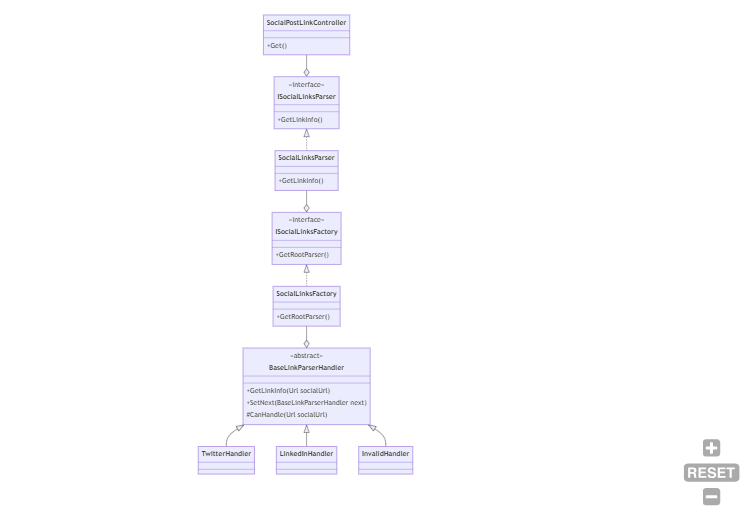
Internally, the code is using the Chain of Responsibility pattern: there is a handler that “knows” if it can handle a specific URL; if so, it just elaborates the input; otherwise, it calls the next handler.
There is also a Factory that builds the chain, and finally, a Service that instantiates the Factory and then resolves the dependencies.
As you can see, this solution can become complex. We could run lots of Unit Tests to validate that the Chain of Responsibility works as expected. We can even write a Unit Tests suite for the Factory.
But, at the end of the day, we don’t really care about the internal structure of the project: as long as it works as expected, we could even use a huge switch block (clearly, with all the consequences of this choice). So, let’s write some Integration Tests.
How to create a custom WebApplicationFactory in .NET
When creating Integration Tests for .NET APIs you have to instantiate a new instance of WebApplicationFactory, a class coming from the Microsoft.AspNetCore.Mvc.Testing NuGet Package.
Since we are going to define it once and reuse it across all the tests, let’s create a new class that extends WebApplicationFactory, and add some custom behavior to it.
public class IntegrationTestWebApplicationFactory : WebApplicationFactory<Program>
{

}
Let’s focus on the Program class: as you can see, the WebApplicationFactory class requires an entry point. Generally speaking, it’s the Program class of our application.
If you hover on WebApplicationFactory<Program> and hit CTRL+. on Visual Studio, the autocomplete proposes two alternatives: one is the Program class defined in your APIs, while the other one is the Program class defined in Microsoft.VisualStudio.TestPlatform.TestHost. Choose the one for your API application! The WebApplicationFactory class will then instantiate your API following the instructions defined in your Program class, thus resolving all the dependencies and configurations as if you were running your application locally.
What to do if you don’t have the Program class? If you use top-level statements, you don’t have the Program class, because it’s “implicit”. So you cannot reference the whole class. Unless… You have to create a new partial class named Program, and leave it empty: this way, you have a class name that can be used to reference the API definition:
public partial class Program { }
Here you can override some definitions of the WebHost to be created by calling ConfigureWebHost:
public class IntegrationTestWebApplicationFactory : WebApplicationFactory<Program>
{
    protected override void ConfigureWebHost(IWebHostBuilder builder)
    {
          builder.ConfigureAppConfiguration((host, configurationBuilder) => { });
    }
}
How to use WebApplicationFactory in your NUnit tests
It’s time to start working on some real Integration Tests!
As we said before, we have only one HTTP endpoint, defined like this:
private readonly ISocialLinkParser _parser;
private readonly ILogger<SocialPostLinkController> _logger;
private readonly IConfiguration _config;

public SocialPostLinkController(ISocialLinkParser parser, ILogger<SocialPostLinkController> logger, IConfiguration config)
{
    _parser = parser;
    _logger = logger;
    _config = config;
}

[HttpGet]
public IActionResult Get([FromQuery] string uri)
{
    _logger.LogInformation("Received uri {Uri}", uri);
    if (Uri.TryCreate(uri, new UriCreationOptions {  }, out Uri _uri))
    {
        var linkInfo = _parser.GetLinkInfo(_uri);
        _logger.LogInformation("Uri {Uri} is of type {Type}", uri, linkInfo.SocialNetworkName);

        var instance = new Instance
        {
            InstanceName = _config.GetValue<string>("InstanceName"),
            Info = linkInfo
        };
        return Ok(instance);
    }
    else
    {
        _logger.LogWarning("Uri {Uri} is not a valid Uri", uri);
        return BadRequest();
    }
}
We have 2 flows to validate:
- If the input URI is valid, the HTTP Status code should be 200;
- If the input URI is invalid, the HTTP Status code should be 400;
We could simply write Unit Tests for this purpose, but let me write Integration Tests instead.
First of all, we have to create a test class and create a new instance of IntegrationTestWebApplicationFactory. Then, we will create a new HttpClient every time a test is run that will automatically include all the services and configurations defined in the API application.
public class ApiIntegrationTests : IDisposable
{
    private IntegrationTestWebApplicationFactory _factory;
    private HttpClient _client;

    [OneTimeSetUp]
    public void OneTimeSetup() => _factory = new IntegrationTestWebApplicationFactory();

    [SetUp]
    public void Setup() => _client = _factory.CreateClient();

    public void Dispose() => _factory?.Dispose();
}
As you can see, the test class implements IDisposable so that we can call Dispose() on the IntegrationTestWebApplicationFactory instance.
From now on, we can use the _client instance to work with the in-memory instance of the API.
One of the best parts of it is that, since it’s an in-memory instance, we can even debug our API application. When you create a test and put a breakpoint in the production code, you can hit it and see the actual values as if you were running the application in a browser.
Now that we have the instance of HttpClient, we can create two tests to ensure that the two cases we defined before are valid. If the input string is a valid URI, return 200:
[Test]
public async Task Should_ReturnHttp200_When_UrlIsValid()
{
    string inputUrl = "https://twitter.com/BelloneDavide/status/1682305491785973760";

    var result = await _client.GetAsync($"SocialPostLink?uri={inputUrl}");

    Assert.That(result.StatusCode, Is.EqualTo(HttpStatusCode.OK));
}
Otherwise, return Bad Request:
[Test]
public async Task Should_ReturnBadRequest_When_UrlIsNotValid()
{
    string inputUrl = "invalid-url";

    var result = await _client.GetAsync($"/SocialPostLink?uri={inputUrl}");

    Assert.That(result.StatusCode, Is.EqualTo(HttpStatusCode.BadRequest));
}
How to create test-specific configurations using InMemoryCollection
WebApplicationFactory is highly configurable thanks to the ConfigureWebHost method. For instance, you can customize the settings injected into your services.
Usually, you want to rely on the exact same configurations defined in your appsettings.json file to ensure that the system behaves correctly with the “real” configurations.
For example, I defined the key “InstanceName” in the appsettings.json file whose value is “Real”, and whose value is used to create the returned Instance object. We can validate that that value is being read from that source as validated thanks to this test:
[Test]
public async Task Should_ReadInstanceNameFromSettings()
{
    string inputUrl = "https://twitter.com/BelloneDavide/status/1682305491785973760";

    var result = await _client.GetFromJsonAsync<Instance>($"/SocialPostLink?uri={inputUrl}");

    Assert.That(result.InstanceName, Is.EqualTo("Real"));
}
But some other times you might want to override a specific configuration key.
The ConfigureAppConfiguration method allows you to customize how you manage Configurations by adding or removing sources.
If you want to add some configurations specific to the WebApplicationFactory, you can use AddInMemoryCollection, a method that allows you to add configurations in a key-value format:
protected override void ConfigureWebHost(IWebHostBuilder builder)
{
    builder.ConfigureAppConfiguration((host, configurationBuilder) =>
    {
        configurationBuilder.AddInMemoryCollection(
            new List<KeyValuePair<string, string?>>
            {
                new KeyValuePair<string, string?>("InstanceName", "FromTests")
            });
    });
}
Even if you had the InstanceName configured in your appsettings.json file, the value is now overridden and set to FromTests.
You can validate this change by simply replacing the expected value in the previous test:
[Test]
public async Task Should_ReadInstanceNameFromSettings()
{
    string inputUrl = "https://twitter.com/BelloneDavide/status/1682305491785973760";

    var result = await _client.GetFromJsonAsync<Instance>($"/SocialPostLink?uri={inputUrl}");

    Assert.That(result.InstanceName, Is.EqualTo("FromTests"));
}
If you also want to discard all the other existing configuration sources, you can call configurationBuilder.Sources.Clear() before AddInMemoryCollection and remove all the other existing configurations.
How to set up custom dependencies for your tests
Maybe you don’t want to resolve all the existing dependencies, but just a subset of them. For example, you might not want to call external APIs with a limited number of free API calls to avoid paying for the test-related calls. You can then rely on Stub classes that simulate the dependency by giving you full control of the behavior.
We want to replace an existing class with a Stub one: we are going to create a stub class that will be used instead of SocialLinkParser:
public class StubSocialLinkParser : ISocialLinkParser
{
    public LinkInfo GetLinkInfo(Uri postUri) => new LinkInfo
    {
        SocialNetworkName = "test from stub",
        Id = "test id",
        SourceUrl = postUri,
        Username = "test username"
    };
}
We can then customize Dependency Injection to use StubSocialLinkParser in place of SocialLinkParser by specifying the dependency within the ConfigureTestServices method:
builder.ConfigureTestServices(services =>
{
    services.AddScoped<ISocialLinkParser, StubSocialLinkParser>();
});
Finally, we can create a method to validate this change:
[Test]
public async Task Should_UseStubName()
{
    string inputUrl = "https://twitter.com/BelloneDavide/status/1682305491785973760";

    var result = await _client.GetFromJsonAsync<Instance>($"/SocialPostLink?uri={inputUrl}");

    Assert.That(result.Info.SocialNetworkName, Is.EqualTo("test from stub"));
}
How to create Integration Tests on specific resolved dependencies
Now we are going to test that the SocialLinkParser does its job, regardless of the internal implementation. Right now we have used the Chain of Responsibility pattern, and we rely on the ISocialLinksFactory interface to create the correct sequence of handlers. But we don’t know in the future how we will define the code: maybe we will replace it all with a huge if-else sequence - the most important part is that the code works, regardless of the internal implementation.
We can proceed in two ways: writing tests on the interface or writing tests on the concrete class.
For the sake of this article, we are going to run tests on the SocialLinkParser class. Not the interface, but the concrete class. The first step is to add the class to the DI engine in the Program class:
builder.Services.AddScoped<SocialLinkParser>();
Now we can create a test to validate that it is working:
[Test]
public async Task Should_ResolveDependency()
{
    using (var _scope = _factory.Services.CreateScope())
    {
        var service = _scope.ServiceProvider.GetRequiredService<SocialLinkParser>();
        Assert.That(service, Is.Not.Null);
        Assert.That(service, Is.AssignableTo<SocialLinkParser>());
    }
}
As you can see, we are creating an IServiceScope by calling _factory.Services.CreateScope(). Since we have to discard this scope after the test run, we have to place it within a using block. Then, we can create a new instance of SocialLinkParser by calling _scope.ServiceProvider.GetRequiredService<SocialLinkParser>() and create all the tests we want on the concrete implementation of the class.
The benefit of this approach is that you have all the internal dependencies already resolved, without relying on mocks. You can then ensure that everything, from that point on, works as you expect.
Here I created the scope within a using block. There is another approach that I prefer: create the scope instance in the SetUp method, and call Dispose() on it the the TearDown phase:
protected IServiceScope _scope;
protected SocialLinkParser _sut;
private IntegrationTestWebApplicationFactory _factory;

[OneTimeSetUp]
public void OneTimeSetup() => _factory = new IntegrationTestWebApplicationFactory();

[SetUp]
public void Setup()
{
    _scope = _factory.Services.CreateScope();
    _sut = _scope.ServiceProvider.GetRequiredService<SocialLinkParser>();
}

[TearDown]
public void TearDown()
{
    _sut = null;
    _scope.Dispose();
}

public void Dispose() => _factory?.Dispose();
You can see an example of the implementation here in the SocialLinkParserTests class.
Where are my logs?
Sometimes you just want to see the logs generated by your application to help you debug an issue (yes, you can simply debug the application!). But, unless properly configured, the application logs will not be available to you.
But you can add logs to the console easily by customizing the adding the Console sink in your ConfigureTestServices method:
builder.ConfigureTestServices(services =>
{
    services.AddLogging(builder => builder.AddConsole().AddDebug());
});
Now you will be able to see all the logs you generated in the Output panel of Visual Studio by selecting the Tests source:
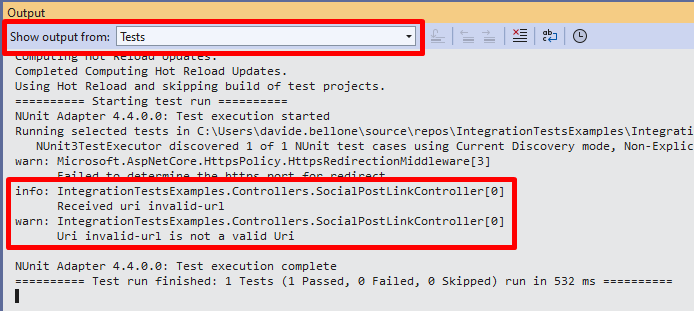
Beware that you are still reading the configurations for logging from the appsettings file! If you have specified in your project to log directly to a sink (such as DataDog or SEQ), your tests will send those logs to the specified sinks. Therefore, you should get rid of all the other logging sources by calling ClearProviders():
services.AddLogging(builder => builder.ClearProviders() .AddConsole().AddDebug());
Full example
In this article, we’ve configured many parts of our WebApplicationFactory. Here’s the final result:
public class IntegrationTestWebApplicationFactory : WebApplicationFactory<Program>
{
    protected override void ConfigureWebHost(IWebHostBuilder builder)
    {
        builder.ConfigureAppConfiguration((host, configurationBuilder) =>
        {
            // Remove other settings sources, if necessary
            configurationBuilder.Sources.Clear();

            //Create custom key-value pairs to be used as settings
            configurationBuilder.AddInMemoryCollection(
                new List<KeyValuePair<string, string?>>
                {
                    new KeyValuePair<string, string?>("InstanceName", "FromTests")
                });
        });

        builder.ConfigureTestServices(services =>
        {
            //Add stub classes
            services.AddScoped<ISocialLinkParser, StubSocialLinkParser>();

            //Configure logging
            services.AddLogging(builder => builder.ClearProviders().AddConsole().AddDebug());
        });
    }
}
You can find the source code used for this article on my GitHub; feel free to download it and toy with it!
Further readings
This is an in-depth article about Integration Tests in .NET. I already wrote an article about it with a simpler approach that you might enjoy:
🔗 How to run Integration Tests for .NET API | Code4IT
This article first appeared on Code4IT 🐧
As I often say, a few Integration Tests are often more useful than a ton of Unit Tests. Focusing on Integration Tests instead that on Unit Tests has the benefit of ensuring that the system behaves correctly regardless of the internal implementation.
In this article, I used the Chain of Responsibility pattern, so Unit Tests would be tightly coupled to the Handlers. If we decided to move to another pattern, we would have to delete all the existing tests and rewrite everything from scratch.
Therefore, in my opinion, the Testing Diamond is often more efficient than the Testing Pyramid, as I explained here:
🔗 Testing Pyramid vs Testing Diamond (and how they affect Code Coverage) | Code4IT
Wrapping up
This was a huge article, I know.
Again, feel free to download and run the example code I shared on my GitHub.
I hope you enjoyed this article! Let's keep in touch on LinkedIn, Twitter or BlueSky! 🤜🤛
Happy coding!
🐧